
Recently I added a picture and a link to my e-mail address onto the blog (see right, underneath "About Me"). I am very happy with the end result, especially as I had managed to do it using free software and barely any knowledge of how to make such a thing.
Initially I searched on Google for information on how to create an "e-mail me" link, but found very little help. Therefore, I felt it was appropriate to publish my own guide so that other bloggers may find a solution to this problem. I should point out that the final stage of this guide is for use with the blogger/blogspot website. I have no idea if the same functions are available on other blog sites.
Below is my basic 10-step guide for making and adding an e-mail link to your blog:


5. As long as there were no other images saved on the desktop, the logo should appear on its own on top of a white background (if there are other images with the logo you will need to move the image into a folder where it is the only picture file, and repeat step 4 again).
6. Untick the box on the left which says "Draw Shadows". Move the image into the centre of the page by clicking and dragging. It is also possible that the logo is on an angle. If so, straighten it out by clicking once on the image and turning the wheel around until it says, "Angle 0". It is a good idea to make the image smaller. Again, click once on the logo, but this time move your mouse to the left to change the size -- I re-sized mine down to 50% scale. Make sure the angle remains at 0 before you take your finger off the mouse. Next, click "Create Collage".
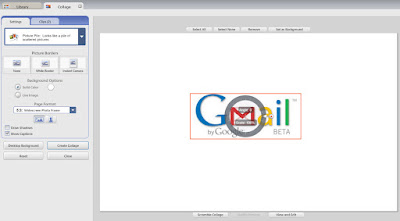 Click on the image for a full-size version
Initially I searched on Google for information on how to create an "e-mail me" link, but found very little help. Therefore, I felt it was appropriate to publish my own guide so that other bloggers may find a solution to this problem. I should point out that the final stage of this guide is for use with the blogger/blogspot website. I have no idea if the same functions are available on other blog sites.
Why go to all this trouble just to add an e-mail address to a blog?
It would be easy to simply type an address and publish it, but writing an address on a blog -- or any website for that matter -- can cause a much higher chance of receiving junk mail in your inbox. Adding an e-mail address in the form of an image -- like mine -- makes it much more difficult for it to be taken by the "spambots".
It would be easy to simply type an address and publish it, but writing an address on a blog -- or any website for that matter -- can cause a much higher chance of receiving junk mail in your inbox. Adding an e-mail address in the form of an image -- like mine -- makes it much more difficult for it to be taken by the "spambots".
Below is my basic 10-step guide for making and adding an e-mail link to your blog:
1. Download Picasa from here. Picasa is a Google-owned image manager and editor. It is completely free to download and use.
2. I thought it would look smart to use my e-mail's logo within my address. Simply do an image search for your e-mail provider's logo. I typed in "Gmail logo". Click on the image, then click "see full size", and save the image to your desktop.
3. Open the image in Picasa, and click "Edit in Picasa", or if you are on the main screen, double click on the image.

As you can see, I need some space before and after the logo so I can add the rest of the e-mail address. Picasa is not designed to be a full-on image editor like Photoshop, so I had to improvise....
4. Find "Create" on the top tool bar, and click "Picture Collage..." (on a side-note, the collage function is a fun tool to use for its original purpose, I created my blogger header with it from this original collage).

5. As long as there were no other images saved on the desktop, the logo should appear on its own on top of a white background (if there are other images with the logo you will need to move the image into a folder where it is the only picture file, and repeat step 4 again).
6. Untick the box on the left which says "Draw Shadows". Move the image into the centre of the page by clicking and dragging. It is also possible that the logo is on an angle. If so, straighten it out by clicking once on the image and turning the wheel around until it says, "Angle 0". It is a good idea to make the image smaller. Again, click once on the logo, but this time move your mouse to the left to change the size -- I re-sized mine down to 50% scale. Make sure the angle remains at 0 before you take your finger off the mouse. Next, click "Create Collage".
 Click on the image for a full-size version
7. Now you should have an image file which you can edit using Picasa. First we will add the text. Click on "Text". Write out your e-mail address in the text box, leaving out your e-mail provider's name. Using the same method for resizing images, click and drag the text box to bring the font size level with the image's text. Point the cursor to the centre of the box to move the text box. Play around with this for a minute, find a nice font, and make sure the text fits in with the logo.
8. I decided to change the colours of the font to match the Gmail logo. If you want to use more than one colour for the text, you need to use separate text boxes for each colour -- a bit of a chore I know. I chose the colours directly from the logo by using the pipette tool.
 10. Finally, to add the image to your blog, click "Layout", "Add Gadget", and choose "Picture". The "Configure Image" window should now pop-up. In the "Link" box, write this:
8. I decided to change the colours of the font to match the Gmail logo. If you want to use more than one colour for the text, you need to use separate text boxes for each colour -- a bit of a chore I know. I chose the colours directly from the logo by using the pipette tool.
9. Next, crop the image to a suitable size and apply changes. Voila, your e-mail logo is finished.
 10. Finally, to add the image to your blog, click "Layout", "Add Gadget", and choose "Picture". The "Configure Image" window should now pop-up. In the "Link" box, write this:
mailto:(enter your e-mail address here with no spaces and no brackets)
Upload the image and tick the box that says, "Shrink to fit". Using "Layout" in Blogger, move the picture to your desired location, and save changes. If everything has gone to plan, your e-mail logo should now appear on your blog. When the image is clicked it will open an e-mail form where visitors can conveniently write to you.
If you have any problems or questions with this guide, feel free to e-mail me.
....normal service will resume tomorrow.
5 comments:
umm...interesting though it looks like a little bit complicated,but i'd like to try if I got time.
Thanks for this, seems a bit complex, but looks cool!
Brilliant job baby, it looks really cool!! If I ever want that, I'll just ask u to do it for me haha~ : D xxx
Wow! Yes, it seems a bit complicated, but I think u're professional on it!
Thank you everybody. I know it is a little complicated, but the software isn't really designed to produce such a thing, I had to improvise quite a lot. Once you get the hang of using the Picasa software, it is easier than it looks.
Post a Comment